Monday, July 29, 2013

Mani-Monday: Wild Neon


It’s Monday again, which means it’s time for another nail look! This time our wild side is coming out with these nails…RAWR! Who doesn’t love 
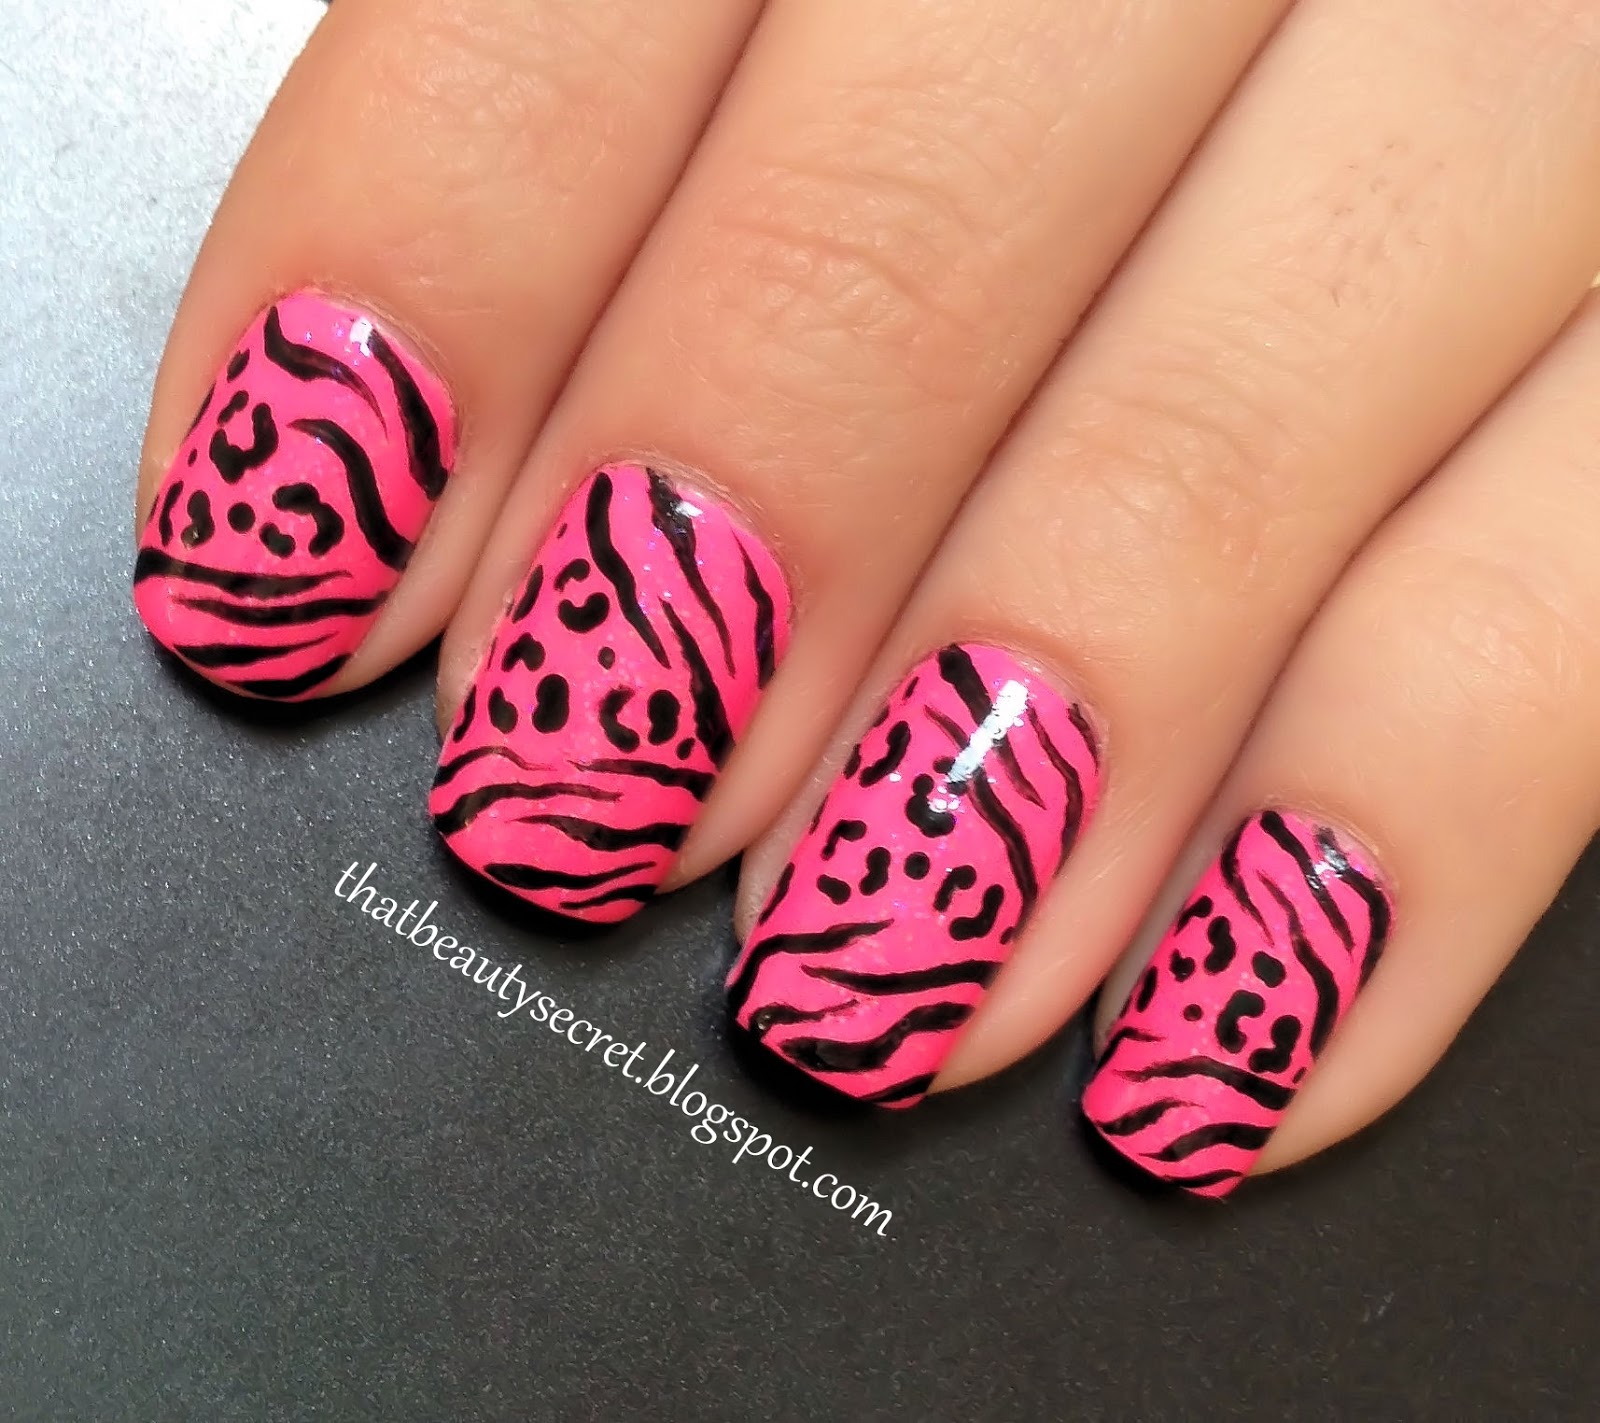
zebra and leopard print nails, BUT what’s better than a nail look with BOTH zebra and leopard…NOTHING! With this fun and wild print and the bright neon nail polish, your nails are sure to be a stand out. To get this look:
 
You will need:
Base coat
Pink neon nail polish
Clear sparkle nail polish
Black acrylic or nail polish
Top coat
Striping brush or toothpick
Dotting tool
 
Step 1: First, apply your base coat. Then apply two coats of your pink neon polish. I used ‘24/7’ by Sinful Colors. Then apply your clear sparkle nail polish, I used ‘XL7’ by Inglot, which has a blue sparkle to give the nails an interesting look in the light. Wait for your nails to dry a few minutes.
 
Step 2: Next, using a striping brush or toothpick, dip it in the black acrylic or nail polish and create the zebra pattern. Create the zebra pattern in a diagonal on the top and half part of the nail (as seen in the picture above). Then, using your dotting tool or toothpick, dip it in the black acrylic or nail polish and create the leopard print in the empty space between the zebra print. Wait a few minutes for your nails to dry, so that the black will not spread when applying the top coat.
 
Step 3: Lastly, apply a generous amount of top coat and you’re done! Have fun with these wild nails and go show them off.

Monday, July 22, 2013

Mani-Monday: Stripes and Flowers


This week I created a simple nail look with a pop of color. It has a summery and girly feel. This nail design may take a while to create, but you are left with a great nail look. To get this look:
 
You will need:
Base coat
White nail polish
Black nail polish
Pink neon nail polish
Green neon nail polish
Top coat
Striping tape
Dotting tool or toothpick
 
Step 1: First, apply your base coat. Then apply two coats of your white polish, I used ‘Porcelain Party’ by Maybelline. Wait for your nails to completely dry. Waiting for your nails to dry is important because if your nails are still wet the tape will lift the nail polish).
 
 
Step 2: Apply a piece of striping tape vertically. Then leave a little bit of space and apply another piece of striping tape. Then leave a bit of space again and apply another piece of striping tape. Then leave a bit of space again and apply your last piece of striping tape. (LIKE THE PICTURE BELOW) 

 
Step 3: Using your black polish, I used ‘Onyx Rush’ by Maybelline, paint over the striping tape. Make sure to avoid applying the black polish outside the last two pieces of striping tape. Peel the striping tape off immediately (peel it off slowly). (LIKE THE PICTURE BELOW)
 
 
Step 4: Then, using your dotting tool or toothpick, dip it into your neon pink polish, I used ‘24/7’ by Sinful Colors, and dot five circles to create a flower. Then dip your dotting tool or toothpick into your green neon polish, I used ‘Summer Rain’ by Duri, and create a dot in the middle of the flower.
 
Step 5: Lastly, apply a generous amount of top coat and you are done!

Monday, July 15, 2013

Mani-Monday: Studded Camo

 
Studded camouflage items have definitely come back into style and can be seen in any store. With this week’s nail design, I was inspired by this trend. I created a camouflage nail print and then dotted gold down the center of my nail. If you don’t have any studded camo pieces in your closet, why not wear them on your nails! To get this look:
 
You will need:
Base coat
Light green nail polish
Dark green nail polish
Brown nail polish
Black nail polish
Gold nail polish
Matte top coat
Dotting tool or toothpick
 
Step 1: First, apply your base coat. Then apply two coats of your light green polish, I used ‘It’s Totally Karma’ by Sephora by OPI. Allow to dry for a few minutes.
 
Step 2: Now, apply patches of the dark green, brown, and black on the nail. First, using your darker green polish, I used ‘Leaf Him at the Altar’ by Sephora by OPI, make a few randomly places patches. Then, using your brown polish, I used ‘milk chocolate chunk’ by Sephora, repeat the same step and create a few randomly place patches and you can even overlap the green to create a more camo look. Lastly, repeat this step again and over lapping the other colors, but this time using the black polish, I used ‘Where’s the Soiree’ by Color Club.
 
Step 3: Next, apply your matte top coat. Allow it to dry a few minutes. 
 
Step 4: Lastly, using your dotting tool or toothpick, dip it into the gold polish, I used ‘Charge It!’ by Sephora by OPI, and create dots down the center of your nail. (You can also use studs if you would like). Applying the gold after applying the matte top coat allows the gold to still have a shine rather than it being matte. Then you’re done! Show off those trendy studded camo nails.

Monday, July 8, 2013

Mani-Monday: Neon French

 
I love neon nail polishes, especially for the summer. This time I wanted to create something simple with bright colors. This nail design allows us to take a twist on the classic French manicure by adding color and lines. It’s fun and easy, but it does take a bit longer than other designs because of the drying time. To get this nail look:
 
You will need:
Base coat
White nail polish
Pink neon nail polish
Green neon nail polish
Top coat
Striping tape
 
Step 1: First, apply your base coat. Then apply two coats of your white polish, I used ‘White Hot’ by Sephora by OPI. Wait for your nails to completely dry. Waiting for your nails to dry is important because if your nails are still wet the tape will lift the nail polish).
Step 2: Apply striping tape on the very tip of your nail. Then leave a little bit of space and apply another piece of striping tape. Then leave a bit of space again and apply another piece of striping tape. (LIKE THE PICTURE BELOW)
 
 
Step 3: On the top space apply the green neon polish, I used ‘Summer Rain’ by Duri. Then on the bottom space apply the pink neon polish, I used ‘24/7’ by Sinful Colors. Peel the striping tape off immediately (peel it off slowly). (LIKE THE PICTURE BELOW)
 
 
Step 4: Then, Lastly, apply a top coat and you are done! Simple, fun, and colorful mani’s are just the best.

Monday, July 1, 2013

Mani-Monday: Fourth of July

 
Fourth of July is coming up and we definitely need to get our nails in the spirit! I wanted to create something fun and patriotic. I love the look of each nail being different. This nail look takes some time to create and some patience, but the results will definitely make your nails a showstopper. To get this look:
 
You will need:
Base coat
Red nail polish
White nail polish
Blue nail polish
Top coat
Striping brush or toothpick
Star nail stamp (optional)
Striping tape
 
Step 1: First, apply your base coat. Then apply two coats of your white polish on all your fingers except the ring finger. I used ‘White Hot’ by Sephora by OPI. Apply two coats of the blue on your ring finger. I used ‘Sapphire Siren’ by Maybelline. Wait for your nails to dry.
 
Step 2: PINKY—apply striping tape on the very tip on your nail and then leave a little bit of space and then apply another piece of striping tape and then leave a bit of space again and then apply another piece of striping tape. On the top space apply the blue polish and then on the bottom space the red polish. I used ‘It girl’ by Sephora. Peel the striping tape off immediately. RING FINGER—using a star shaped nail stamp or you can freehand it to create the stars on your ring finger (if you cannot create the stars, you can just create polka dots). MIDDLE FINGER—using a striping brush or toothpick write out July with the polish and 4th with the red polish. POINTER—apply the striping tape leaving space between the next piece. Apply a generous amount of the red polish and peel off the striping tape right away. THUMB—using your red nail polish create a diagonal and then do the same with the blue nail polish.
 
Step 3: Then, Lastly, apply a top coat and you are done with your patriotic nails!
 
Have an amazing Fourth of July!