I did these nails a few weeks ago for Breast Cancer
Awareness. Since October is Breast Cancer Awareness month, I thought I would
upload these before the month is over. They are really quick, easy, and simple
to do. And obviously those are the best nail designs. You get a fun mani in a
short amount of time. To get this look:
Showing posts with label pink. Show all posts
Monday, October 28, 2013
Mani-Monday: Breast Cancer Awareness
Labels:
awareness,
breast cancer,
how to,
mani,
mani-monday,
manicure,
nail art,
nail color,
nail polish,
nails,
pink,
polka dots,
ribbon,
silver,
thatbeautysecret,
thatbeautysecret.blogspot.com,
white
Monday, August 12, 2013
Mani-Monday: Pink Splatter
When I started getting into nail art a few years ago, I used
to love creating splatter on my nails. I haven’t created this design in about
two years so I thought ‘why not do it again’. This nail look is very versatile
and so much fun to play around with using different colors. To get this look:
You will need:
Base coat
Bright pink nail polish
Black nail polish
White nail polish
Light pink nail polish
Top coat
Toothpick
Step 1: First, apply your base coat. Then apply two coats of
your bright pink polish. I used ‘Warhol’ by Color Club. Wait for your nails to
dry a few minutes.
Step 2: Next, using your black nail polish, I used ‘Onyx
Rush’ by Maybelline, create a dot in the spot you want the splatter to be.
Then, using your toothpick, drag out lines from the black dot to create a
splatter effect. Also, create a few dots around the splatter. Then, using your
white nail polish, I used ‘Porcelain Party’ by Maybelline, use the same
technique to create another splatter. Lastly, using your pink nail polish, I used
‘Pink Blink’ by Sally Hansen, use the same technique to create your last
splatter. Wait for the splatter to dry a few minutes so the color doesn’t drag
when you apply the top coat.
Step 3: Lastly, apply a generous amount of top coat and you
are done! These splatter nails are so fun and creative and can be recreated
with many different colors.
Monday, July 29, 2013
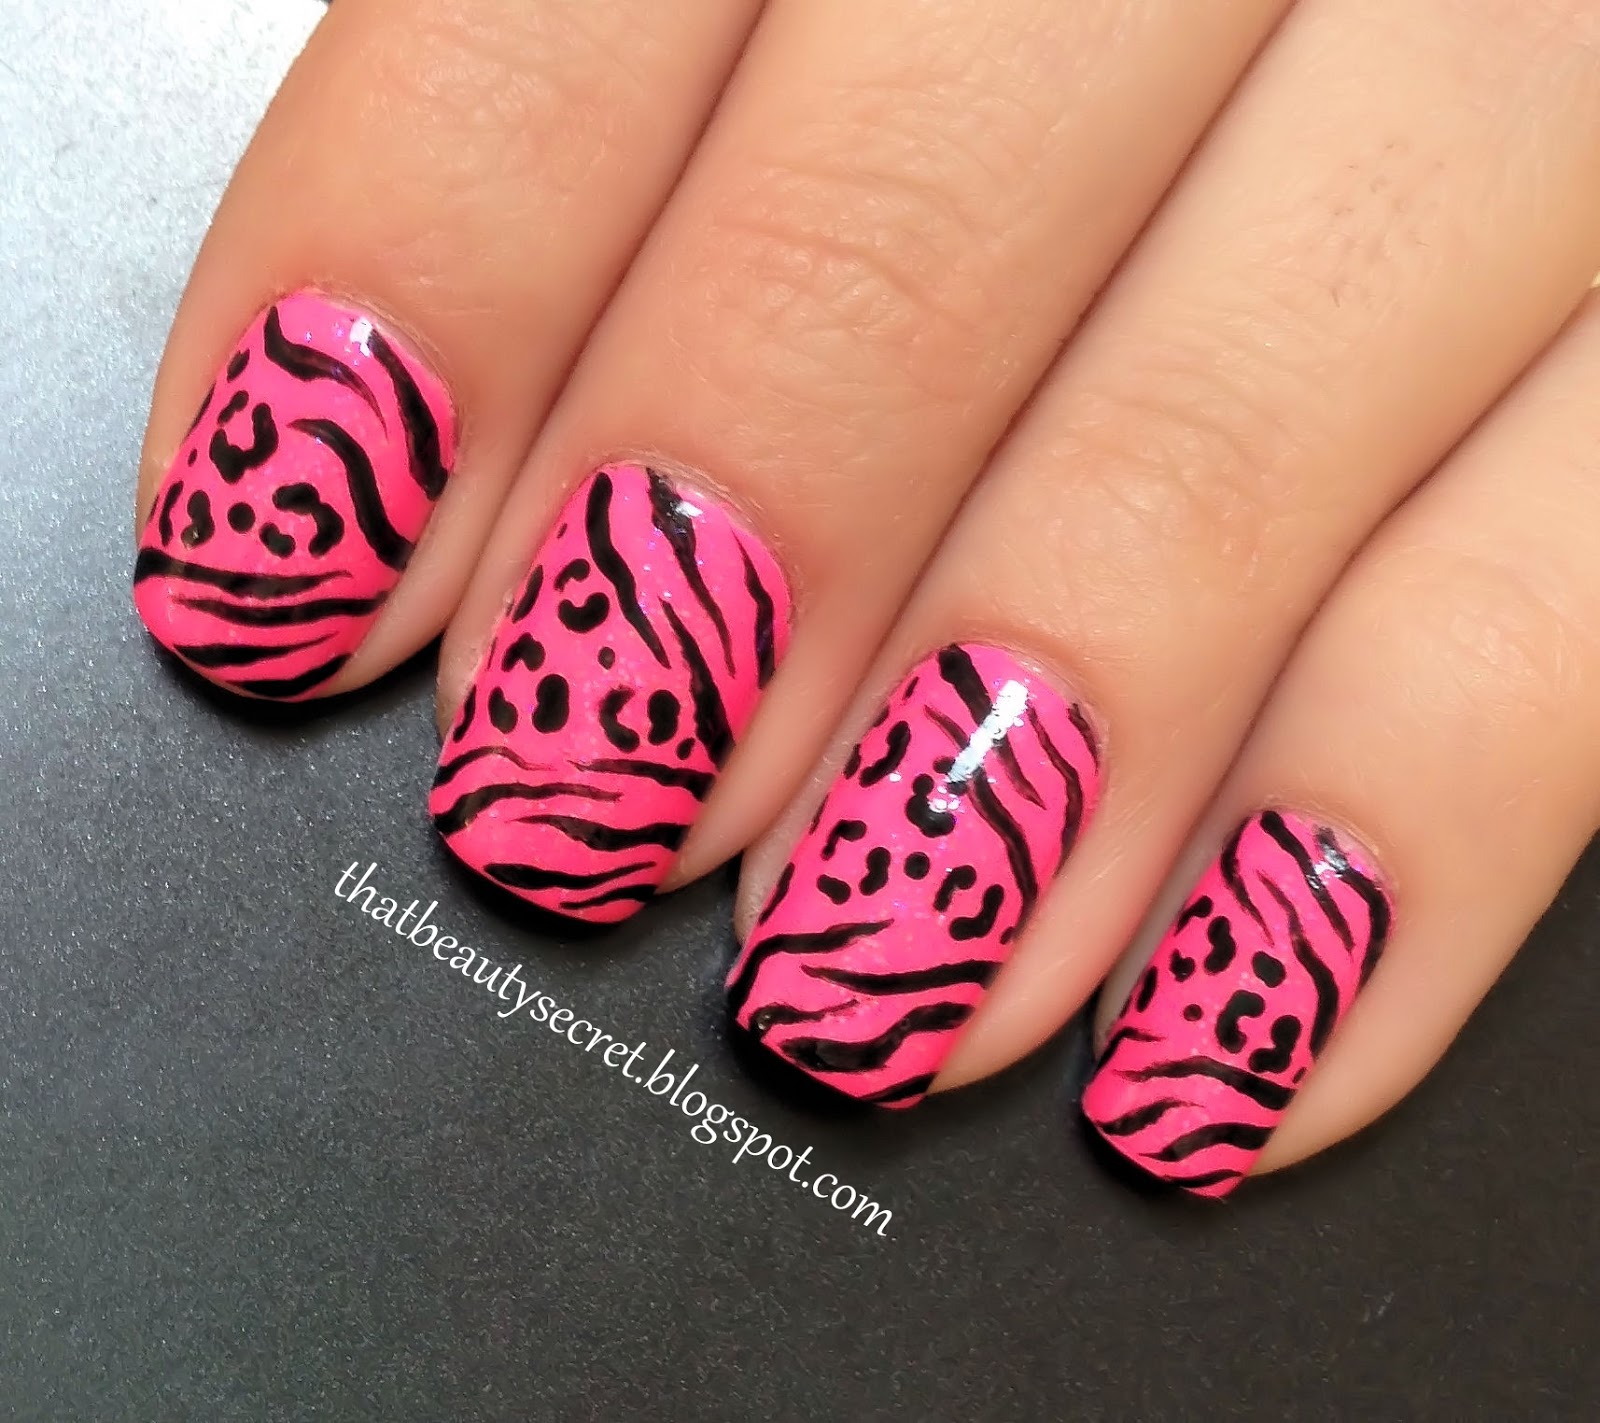
Mani-Monday: Wild Neon
It’s Monday again, which means it’s time for another nail
look! This time our wild side is coming out with these nails…RAWR! Who doesn’t love
zebra and leopard print nails, BUT what’s better than a nail look with BOTH
zebra and leopard…NOTHING! With this fun and wild print and the bright neon
nail polish, your nails are sure to be a stand out. To get this look:
You will need:
Base coat
Pink neon nail polish
Clear sparkle nail polish
Black acrylic or nail polish
Top coat
Striping brush or toothpick
Dotting tool
Step 1: First, apply your base coat. Then apply two coats of
your pink neon polish. I used ‘24/7’ by Sinful Colors. Then apply your clear
sparkle nail polish, I used ‘XL7’ by Inglot, which has a blue sparkle to give
the nails an interesting look in the light. Wait for your nails to dry a few
minutes.
Step 2: Next, using a striping brush or toothpick, dip it in
the black acrylic or nail polish and create the zebra pattern. Create the zebra
pattern in a diagonal on the top and half part of the nail (as seen in the
picture above). Then, using your dotting tool or toothpick, dip it in the black
acrylic or nail polish and create the leopard print in the empty space between
the zebra print. Wait a few minutes for your nails to dry, so that the black
will not spread when applying the top coat.
Step 3: Lastly, apply a generous amount of top coat and
you’re done! Have fun with these wild nails and go show them off.
Monday, July 22, 2013
Mani-Monday: Stripes and Flowers
This week I created a simple nail look with a pop of color.
It has a summery and girly feel. This nail design may take a while to create,
but you are left with a great nail look. To get this look:
You will need:
Base coat
White nail polish
Black nail polish
Pink neon nail polish
Green neon nail polish
Top coat
Striping tape
Dotting tool or toothpick
Step 1: First, apply your base coat. Then apply two coats of
your white polish, I used ‘Porcelain Party’ by Maybelline. Wait for your nails
to completely dry. Waiting for your
nails to dry is important because if your nails are still wet the tape will
lift the nail polish).
Step 2: Apply a piece of striping tape vertically. Then
leave a little bit of space and apply another piece of striping tape. Then
leave a bit of space again and apply another piece of striping tape. Then leave
a bit of space again and apply your last piece of striping tape. (LIKE THE
PICTURE BELOW)
Step 3: Using your black polish, I used ‘Onyx Rush’ by Maybelline,
paint over the striping tape. Make sure to avoid applying the black polish
outside the last two pieces of striping tape. Peel the striping tape off
immediately (peel it off slowly). (LIKE THE PICTURE BELOW)
Step 4: Then, using your dotting tool or toothpick, dip it
into your neon pink polish, I used ‘24/7’ by Sinful Colors, and dot five
circles to create a flower. Then dip your dotting tool or toothpick into your
green neon polish, I used ‘Summer Rain’ by Duri, and create a dot in the middle
of the flower.
Step 5: Lastly, apply a generous amount of top coat and you
are done!
Monday, July 8, 2013
Mani-Monday: Neon French
I love neon nail polishes, especially for the summer. This
time I wanted to create something simple with bright colors. This nail design
allows us to take a twist on the classic French manicure by adding color and
lines. It’s fun and easy, but it does take a bit longer than other designs
because of the drying time. To get this nail look:
You will need:
Base coat
White nail polish
Pink neon nail polish
Green neon nail polish
Top coat
Striping tape
Step 1: First, apply your base coat. Then apply two coats of
your white polish, I used ‘White Hot’ by Sephora by OPI. Wait for your nails to
completely dry. Waiting for your
nails to dry is important because if your nails are still wet the tape will
lift the nail polish).
Step 2: Apply striping tape on the very tip of your nail.
Then leave a little bit of space and apply another piece of striping tape. Then
leave a bit of space again and apply another piece of striping tape. (LIKE THE
PICTURE BELOW)
Step 3: On the top space apply the green neon polish, I used
‘Summer Rain’ by Duri. Then on the bottom space apply the pink neon polish, I
used ‘24/7’ by Sinful Colors. Peel the striping tape off immediately (peel it
off slowly). (LIKE THE PICTURE BELOW)
Step 4: Then, Lastly, apply a top coat and you are done!
Simple, fun, and colorful mani’s are just the best.
Monday, June 24, 2013
Mani-Monday: Rainbow Leopard
A few days ago I decided to treat myself to a little
shopping spree. And that spree came out to buying 11 new nail polishes (I posted
a picture on my Instagram. Follow thatbeautysecret)! I am one HAPPY girl right
now…
When I buy something new, I am the kind of person that likes
to wear it or try it right away. So after getting all those colorful new colors
I just had to create something that used most of the colors. And this colorful
rainbow leopard print nail design was created. It is so fun and summery. I used
a lot of different colors, however, you do not have to use as many. You can use
1, 2, 3, or however many as you would like. To get this look:
You will need:
Base coat
White nail polish
Light green nail polish
Dark green nail polish
Purple nail polish
Blue nail polish
Pink nail polish
Orange nail polish
Yellow nail polish
Toothpick or dotting tool
Top coat
Step 1: First, apply your base coat. Then apply two coats of
your white polish. I used ‘White Hot’ by Sephora by OPI. Wait a few minutes for
your nails to dry.
Step 2: Next, using a toothpick or
dotting tool, dip it in each color and create the leopard pattern. I used ‘Yellow
Umbrella’ by Sephora, ‘Myrtille’ by Sephora, ‘Picnic in the Park’ by Sephora, ‘Domestic
Goddess’ by Sephora by OPI, ‘Caliente Coral’ by Sephora by OPI, ‘It’s Totally
Karma’ by Sephora by OPI, and ‘I’m Wired’ by Sephora by OPI.
Step 3: Then, Lastly, apply a top
coat and voila! Your fun and colorful leopard nails are done.
Labels:
apply,
blue,
green,
leopard,
mani,
mani-monday,
manicure,
nail art,
nail color,
nail polish,
nails,
orange,
pink,
purple,
rainbow,
thatbeautysecret,
thatbeautysecret.blogspot.com,
white,
yellow
Monday, May 20, 2013
Mani-Monday: Tropical Flowers
The weather has been getting warmer and warmer and I wanted
to create some fun and tropical nails. These nails just make me think of Hawaii
and the beach. Oh how much I wish I could be lying on the beach on some island
right now. Well I unfortunately cannot be there but my nails will bring that
tropical feel for me. I used a lot of different colored nail polishes but you
can use only two different colors or use as many or as little as you desire. To
get this look:
You will need:
Base coat
White nail polish
Green nail polish
Yellow nail polish
Purple nail polish
Pink nail polish
Blue nail polish
Orange nail polish
Black acrylic
Striping brush or toothpick
Top coat
Step 1: First, apply your base coat. Then apply 1-2 coats of
your white polish. I used ‘White Hot’ by Sephora by OPI.
Step 2: Next, using your green nail polish, I used ‘Twiggie’
by Color Club, yellow nail polish, I used ‘Yellow Umbrella’ by Sephora, purple
polish, I used ‘Jo’mina’ by Illamasqua, pink nail polish, I used ‘Venom’ by
Duri, blue nail polish, I used ‘Calypso Blue’ by Sally Hansen, and orange nail
polish, I used ‘Orange Fix’ by Maybelline, paint on the flowers on each of your
nails like in the picture above. Wait a few minutes for your nails to dry a bit
before you start applying the black lines.
Step 3: Then, using your striping brush or toothpick, dip it
in the black acrylic and draw on the lines starting from the center of the
flower. Then draw on the three dots near the tops of the lines. Wait about 15
minutes for your nails to dry.
Step 4: Lastly, using a generous amount, apply a top coat
and you’re done! Have fun with those tropical nails and go show them off.
Labels:
apply,
black,
blue,
flowers,
green,
how to,
mani,
mani-monday,
manicure,
nail art,
nail color,
nail polish,
nails,
orange,
pink,
purple,
thatbeautysecret,
thatbeautysecret.blogspot.com,
tropical,
yellow
Monday, May 13, 2013
Mani-Monday: Pastel Spring
I love the look of each nail having a different design on
it. This style has become quite popular. I put together some Spring colors and
created this nail look. It took some time to create but the end result was all
worth it.
You will need:
Base coat
White nail polish
Mint green nail polish
Light pink/coral nail polish
Light purple nail polish
Silver striping tape
Top coat
Step 1: First, apply your base coat. Then apply 1-2 coats of
your white polish. I used ‘White Hot’ by Sephora by OPI.
Step 2: Next, using your mint
green nail polish, I used ‘Mint Mist’ by Maybelline, light pink/coral nail
polish, I used ‘Van D’Go’ by Essie, and light purple polish, I used ‘Lilacism’
by Essie, paint on a section of each color on each of your nails. Let your
nails dry completely.
Step 3: Then, using your striping
tape in silver, apply it on the areas where each color meets.
Step 4: Lastly, apply a top coat
and VOILA, a fun springy nail look.
Monday, April 22, 2013
Mani-Monday : Wild Leopard
I have seen nude and neon nails around lately and I am
loving them! I love the simplicity of the nude polish and then the pop of color
of the neon polish. So I decided to create some fun and wild leopard nails
using a nude polish as a base and a neon pink as the leopard print.
What you will need:
Base coat
Nude polish
Neon polish (any color)
Black acrylic paint
Dotting tool or toothpick
Top coat
Step 1: First, apply your base coat. Then apply two coats of
your nude polish. I used ‘Sandstorm’ by Maybelline. Let it dry for about 5
minutes.
Step 2: Next, using your neon nail
polish, I used ‘Venom’ by Duri, dot a few randomly on each nail.
You can use the tip of the nail polish brush or a dotting tool.
Step 3: Then, using a toothpick,
dip it in the black acrylic and outline the neon dots to create a leopard look.
Lastly, apply a top coat and that’s it! It is subtle yet has a pop of color. Now
show off those fun and wild leopard nails.
Monday, March 18, 2013
Mani-Monday: Marbled and Sparkled
Once again it’s time for Mani-Monday. I loved my nails this time around. I used the plastic wrap technique. Click here for the tutorial on how to achieve this look. I first applied a white polish as a base and then I used three different colors on each nail with the plastic wrap. I used a pink, blue, and purple polish. I like the interesting and marble effect it created. Then, on my ring finger I applied a white polish and let it dry completely and then applied KISS Classic Nail Dress in ‘Peignoir’. This nail design was quick and simple. And I LOVED IT!
Labels:
at home,
blue,
DIY,
how to,
mani,
mani-monday,
manicure,
nail art,
nail color,
nail polish,
nail sticker,
nails,
pink,
polish,
purple,
thatbeautysecret,
thatbeautysecret.blogspot.com,
white
Subscribe to:
Posts (Atom)