Tuesday, December 31, 2013

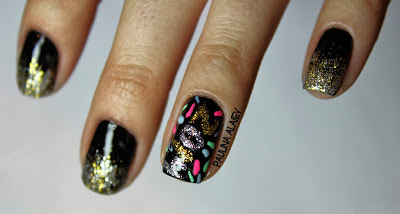
New Year's Eve Nails

Hey there! This video is a bit late. But better late than never! I wanted to share with you my New Year's Eve Nails. I hope you enjoyed these and try them out for tomorrow. Have a happy, healthy, and safe new year. There will be lots of more videos coming up this year. I can't wait to see what this year brings. Subscribe to stay tuned to see what I have planned next! See you next year!!
 
Please LIKE, COMMENT, and SUBSCRIBE
 
Products used:
OPI Nail Envy
Maybelline Color Show -- Onyx Rush
Color Club Striper -- Gold Glitter
Color Club Striper -- Silver Glitter
Sephora by OPI -- Havana Dreams
DURI -- Summer Rain
Sinful Colors -- 24/7
Formula X for Sephora
 
XOXO,
Paulina

Tuesday, December 10, 2013

YouTube Channel!


Sorry I have been MIA and haven’t posted anything in two weeks! But I have been working on creating a YouTube channel! I wouldn't say I'm indecisive but it's more that I don't like to fail at something or displease people. So this took a lot of courage for me to do. I kept going back and forth with whether or not I should create a channel. I had a lot of difficulties with the camera while filming just one video and I kept thinking “what if all the videos are like this” or “is it a sign that I shouldn't do it?” I filmed the tutorial and I was really satisfied with it. But then I edited it and thought ok this could work...it’s just my first video so I'll get better over time. During the day I was so excited about doing this and wanted it but then towards the night I was second guessing myself. But I taught myself a while ago that when you want to do something and you're afraid you just need that one push to JUST DO IT. Whether it's saying something and you're nervous; just blurt it out. Or maybe it's creating a video and putting it up on your very own YouTube channel. Just click that upload button and see what happens. It doesn't hurt anyone and I can always delete it if I don't like where it's going or I don't get enough feedback. So with that said. I DID IT! I created my very own YouTube channel. Search Paulina Alaiev on YouTube to find me! OR click here. It's a huge step and I hope to continue on with this and see where it takes me. My main priority is to show people what I love to do. It will have everything from makeup and hair tutorials, to nail tutorials, and to DIYs. To anyone who reads this I hope you enjoy my videos and please comment and leave any suggestions on what you'd like to see. I will still continue writing blog posts on here. That's basically it. I cannot wait to start making more videos and just see where everything goes. I AM SO EXCITED! The video above is my third video, but first nail tutorial…check it out and see my other tutorial.
 
Ps. PRETTY PLEASE with a cherry on top, like my videos and subscribe to my YouTube channel (it would mean the world to me!!!)
 
Xoxo,
 
Paulina

Thursday, November 21, 2013

Casual Fall OOTD

I love fall because it's sweater season! Don’t get me wrong, I would choose summer over any season any day. But I still love fall fashion, change of leave colors, sitting by a warm fireplace with hot chocolate, and just the cozy weather that comes in the fall. So for a quick outfit of the day, I paired my new (actually want to sleep in comfy) sweater with boyfriend jeans and ankle boots. To accessorize I wore a black oversized handbag, sunglasses with a gold accent to tie into my handbag and jewelry, and I wore hoop earrings (obviously, they’re like my staple jewelry piece), a gunmetal rose ring and two midi rings that I made myself.

Monday, November 18, 2013

Mani-Monday: Brown and Black

I bought a new top and I loved the pattern. I found it very interesting and thought I would try to create a nail art inspired from it. I love the way it turned out. It’s between a leopard print and tortoise print and that’s what I find so cool about this design. To get this look:

Monday, November 4, 2013

Mani-Monday: Blue and Gold

Halloween is over :( Hope everyone had a spooky Halloween. I saw a blue and gold color combination somewhere (I don’t remember where) and just fell in love with the combination. I’ve always liked blue and gold together but this was a light blue and it just looked so nice together. So I created a nail design based off that. I also had a little jar of gold leaf that I have been wanting to use so I thought this would be that perfect opportunity. To get this look:
 
You will need:
Base coat
Light blue nail polish
Gold nail polish
Gold leaf
Top coat
 
Step 1: First, apply your base coat. Then apply two coats of your light blue polish. I used ‘Havana Dreams’ by Sephora by OPI, on all your nails but your ring finger. Then on your ring finger, apply two coats of your gold polish, I used ‘Charge It!’ by Sephora by OPI. 
 
Step 2: Next, take your gold leaf and put on a few on each nail except for the ring finger. If you do not have any gold leaf then you can get a similar look by following my ‘Simply Classy’ tutorial.
 
Step 3: Lastly, apply your top coat and you are done! It’s a very quick and easy mani and you could definitely try it out with any color.
 
Paint on,
Paulina

Thursday, October 31, 2013

Happy Halloween!

 
HAPPY HALLOWEEN!! This is just a quick post on the nails I have on today and how to do them. Black and orange are usually the main colors represented with Halloween, so I thought I would create something using those two colors and then create a cobweb for a spooky halloweeny effect. To get this look:

Monday, October 28, 2013

Mani-Monday: Breast Cancer Awareness

 
I did these nails a few weeks ago for Breast Cancer Awareness. Since October is Breast Cancer Awareness month, I thought I would upload these before the month is over. They are really quick, easy, and simple to do. And obviously those are the best nail designs. You get a fun mani in a short amount of time. To get this look:

Monday, October 21, 2013

Mani-Monday: Sugar Skull

Since Halloween is right around the corner, I thought I would create something for it. I was inspired by the Day of the Dead (Dia de Muertos), which is a holiday that focuses on remembering the friends and family members who have passes on. For this nail design I wanted to create a Sugar Skull, which is used in honoring the deceased. There are so many beautiful interpretations and creation of the Sugar Skull, but my main inspiration for my nail design this week was a picture by Misscarissrose on Instagram (http://instagram.com/p/dQ-EtTOMXD/). I had a lot of fun creating this nail look and loved the way it turned out! To get this look:

Monday, September 30, 2013

Mani-Monday: Fall Sparkle

 
This nail design may be one of my favorites because it is so simple and quick to create, yet is it so classy and it’s something different than just a simple plain mani. My Mint Sparkle nail look was so popular that I thought I would recreate it with a different color combination. You can create this design with so many different colors. To get this look:
 
You will need:
Base coat
Dark green nail polish
Sparkly green nail polish
Top coat
Makeup Sponge (optional)
 
Step 1: First, apply your base coat. Then apply two coats of your dark green polish. I used ‘Dark Room’ by Sephora by OPI. Let it dry for a few minutes.
 
Step 2: Next, using your sparkly green nail polish (you can use a gold or silver too), I used ‘Leaf Him at the Altar’ by Sephora by OPI, apply some on a small piece of makeup sponge and start lightly patting it along the cuticle only going halfway on the nail. Then pat on some more only at the base to intensify the color. Try to create a fading effect.
**If you do not have a makeup sponge, you can simply just use the brush of the polish. Using your sparkly green polish, start lightly applying the polish in upward strokes at the cuticle and stopping about half way. Try to create a fading effect. Apply the sparkly green polish over again but this time just at the base of the cuticle.**
 
Step 3: Lastly, apply a top coat and you’re done! It is classy and perfect for fall. Also it is so simple and quick!

Monday, September 23, 2013

Mani-Monday: Abstract Autumn

 
Since yesterday was the first day of fall, I thought I would create something fall spirited. I came up with something different though and something more abstract. This nail look is abstract paired with simplicity. For the nail polish colors, I was inspired by the changing colors of the leaves in the autumn time. To get this look:
 
You will need:
Base coat
Nude nail polish
Red nail polish
Brown nail polish
Orange nail polish
Yellow nail polish
Dark green nail polish
Dotting tool or toothpick
 
Step 1: First, apply your base coat. Then apply two coats of your red polish, I used ‘Chine Rouge’ by China Glaze, on your pinky, pointer, and thumb. And then apply two coats of your nude polish, I used ‘Sandstorm’ by Maybelline, on you ring and middle finger. Wait a few minutes for your nail polish to dry.
 
Step 2: Next, on your ring finger and middle finger, you are going to use your brown polish, I used ‘milk chocolate chunk’ by Sephora, to create random strokes with the brush on the nail. You are going to continue doing the same method for each color. Using your orange polish, I used ‘Caliente Coral’ by Sephora by OPI; create more strokes, overlapping on some of the brown. Next, using your yellow polish, I used ‘yellow umbrella’ by Sephora, paint on more strokes on the nail. Then using your dark green polish, I used ‘Dark Room’ by Sephora by OPI, create more random strokes. Lastly, using your red polish, I used ‘China Rouge’ by China Glaze, paint on the last few random strokes on the nail. The colors should be overlapping and you can change up the order of which color you want to paint on first, second, third, etc.
 
Step 3: Then, on your pinky, pointer, and thumb, you are going to use your dotting tool or toothpick and dip it in the dark green polish to create the first dot near your cuticle. Then dip the dotting tool in the orange polish and create the next dot right above the dark green dot. Lastly, dip your dotting tool in the yellow polish and create the last dot above the orange dot. 
 
Step 4: Finally, apply your top coat and you are done! I love the abstract look of these nails. Have fun with them and play around with different colors.

Monday, September 9, 2013

Mani-Monday: Ombre Leopard

Sorry I have been MIA, I have a lot of things going on. However, this week’s nail look might be my favorite and I love the color combination. It is simple yet still something different. I think I will always love nude and neon together. The coral nail polish is such a gorgeous color. The picture does not do justice to how beautiful the color is. To get this look:
 

Monday, August 26, 2013

Mani-Monday: Back-to-School

 
**Excuse the broken pinky nail L** School is right around the corner. School may have even started for some of you. So, I decided to create a fun back-to-school mani. I used to love to doodle in my notebook during school and I’m sure a lot of you do it too. That’s what inspired my nails. And for the accent nail, I create a chalkboard, because what is school without a chalkboard filled with notes to copy. To get this look:
 
You will need:
Base coat
White nail polish
Black nail polish
Top coat
Matte top coat
Striping tape
Striping brush or toothpick
Black acrylic and white acrylic (optional)
 
Step 1: First, apply your base coat. Then apply two coats of your white polish, I used ‘Porcelain Party’ by Maybelline, to all your fingers except your ring finger. Then on your ring finger apply two coats of your black polish, I used ‘Onyx Rush’ by Maybelline. Wait for your nails to dry.
 
Step 2: For your ring finger, using your striping brush or toothpick, dip it in the white acrylic or white polish and create the equation (as shown in the picture above). Then for the rest of your fingers, apply your light blue striping tape horizontally on your finger making sure to space them out evenly. Then apply one piece of red striping tape vertically towards the beginning of your nail over the blue striping tape to create a notebook paper look. (If you do not have striping tape, you can draw the lines instead). Then using your striping brush or toothpick, dip it in the black acrylic or black polish and start creating doodles on your nails. I wrote XO on my pinky, I    U on my middle finger, a flower on my pointer, and a smiley face on my thumb. Wait a few minutes for the design to dry.
 
Step 3: Lastly, on your ring finger apply the matte top coat and a regular shine top coat on the rest of your fingers and you are done! These nails just scream back-to-school and you can change them up and create your own doodles.

Monday, August 19, 2013

Mani-Monday: Starry Sky

 
I bought two new blue nail polish colors and a silver glittery top coat. One was a dark blue and another was a light blue polish. So I really wanted to create a look with them. After playing around with them and trying to create a look I came up with this. And unexpectedly when I finished doing my nails I thought that they looked like a starry sky. The more and more I look at my nails now, the more I fall in love with them. And the glitters in the top coat have a sort of blue undertone to them which pulls the nail design together. To get this look:

Monday, August 12, 2013

Mani-Monday: Pink Splatter

 
When I started getting into nail art a few years ago, I used to love creating splatter on my nails. I haven’t created this design in about two years so I thought ‘why not do it again’. This nail look is very versatile and so much fun to play around with using different colors. To get this look:
 
You will need:
Base coat
Bright pink nail polish
Black nail polish
White nail polish
Light pink nail polish
Top coat
Toothpick
 
Step 1: First, apply your base coat. Then apply two coats of your bright pink polish. I used ‘Warhol’ by Color Club. Wait for your nails to dry a few minutes.
 
Step 2: Next, using your black nail polish, I used ‘Onyx Rush’ by Maybelline, create a dot in the spot you want the splatter to be. Then, using your toothpick, drag out lines from the black dot to create a splatter effect. Also, create a few dots around the splatter. Then, using your white nail polish, I used ‘Porcelain Party’ by Maybelline, use the same technique to create another splatter. Lastly, using your pink nail polish, I used ‘Pink Blink’ by Sally Hansen, use the same technique to create your last splatter. Wait for the splatter to dry a few minutes so the color doesn’t drag when you apply the top coat.
 
Step 3: Lastly, apply a generous amount of top coat and you are done! These splatter nails are so fun and creative and can be recreated with many different colors.

Monday, August 5, 2013

Mani-Monday: Dots, Dots, Dots

I got this new nail polish and it is absolutely GORGEOUS! I am in love with the color. It’s such a bright and summery color, it’s like a bright coraly color. When I put this nail polish on I just thought ‘how could I cover up such a gorgeous color with nail art?’ BUT, I obviously can’t go with plain nail polish (haven’t worn just plain nail polish without nail art in about 2+ years). So I created a simple design with a few dots which lets the polish still be the center on attention. To get this look:
 
You will need:
Base coat
Coral nail polish
Black acrylic or nail polish
White acrylic or nail polish
Silver nail polish
Top coat
Dotting tool or toothpick
 
Step 1: First, apply your base coat. Then apply two coats of your bright coral polish. I used ‘East Austin’ by Color Club. Wait for your nails to dry a few minutes.
 
Step 2: Next, using a dotting tool or toothpick, dip it in the black acrylic or nail polish and create the first line of dots vertically at the end of your nail. Then, dip your dotting tool or toothpick in the silver nail polish, I used ‘Give me the 1st Dance’ by Nicole by OPI, and create the second line of dots. Lastly, dip your dotting tool or toothpick in the white acrylic or nail polish and create the last line of dots vertically in the center of the nail. All the dots should have about the same spacing between. Wait for the dots to dry a few minutes so the color doesn’t drag when you apply the top coat.
 
Step 3: Lastly, apply a generous amount of top coat and voila! I love this simple mani this week! This is also such a versatile look and you can change up the colors and have fun with it.

Monday, July 29, 2013

Mani-Monday: Wild Neon


It’s Monday again, which means it’s time for another nail look! This time our wild side is coming out with these nails…RAWR! Who doesn’t love zebra and leopard print nails, BUT what’s better than a nail look with BOTH zebra and leopard…NOTHING! With this fun and wild print and the bright neon nail polish, your nails are sure to be a stand out. To get this look:
 
You will need:
Base coat
Pink neon nail polish
Clear sparkle nail polish
Black acrylic or nail polish
Top coat
Striping brush or toothpick
Dotting tool
 
Step 1: First, apply your base coat. Then apply two coats of your pink neon polish. I used ‘24/7’ by Sinful Colors. Then apply your clear sparkle nail polish, I used ‘XL7’ by Inglot, which has a blue sparkle to give the nails an interesting look in the light. Wait for your nails to dry a few minutes.
 
Step 2: Next, using a striping brush or toothpick, dip it in the black acrylic or nail polish and create the zebra pattern. Create the zebra pattern in a diagonal on the top and half part of the nail (as seen in the picture above). Then, using your dotting tool or toothpick, dip it in the black acrylic or nail polish and create the leopard print in the empty space between the zebra print. Wait a few minutes for your nails to dry, so that the black will not spread when applying the top coat.
 
Step 3: Lastly, apply a generous amount of top coat and you’re done! Have fun with these wild nails and go show them off.

Monday, July 22, 2013

Mani-Monday: Stripes and Flowers


This week I created a simple nail look with a pop of color. It has a summery and girly feel. This nail design may take a while to create, but you are left with a great nail look. To get this look:
 
You will need:
Base coat
White nail polish
Black nail polish
Pink neon nail polish
Green neon nail polish
Top coat
Striping tape
Dotting tool or toothpick
 
Step 1: First, apply your base coat. Then apply two coats of your white polish, I used ‘Porcelain Party’ by Maybelline. Wait for your nails to completely dry. Waiting for your nails to dry is important because if your nails are still wet the tape will lift the nail polish).
 
 
Step 2: Apply a piece of striping tape vertically. Then leave a little bit of space and apply another piece of striping tape. Then leave a bit of space again and apply another piece of striping tape. Then leave a bit of space again and apply your last piece of striping tape. (LIKE THE PICTURE BELOW) 

 
Step 3: Using your black polish, I used ‘Onyx Rush’ by Maybelline, paint over the striping tape. Make sure to avoid applying the black polish outside the last two pieces of striping tape. Peel the striping tape off immediately (peel it off slowly). (LIKE THE PICTURE BELOW)
 
 
Step 4: Then, using your dotting tool or toothpick, dip it into your neon pink polish, I used ‘24/7’ by Sinful Colors, and dot five circles to create a flower. Then dip your dotting tool or toothpick into your green neon polish, I used ‘Summer Rain’ by Duri, and create a dot in the middle of the flower.
 
Step 5: Lastly, apply a generous amount of top coat and you are done!

Monday, July 15, 2013

Mani-Monday: Studded Camo

 
Studded camouflage items have definitely come back into style and can be seen in any store. With this week’s nail design, I was inspired by this trend. I created a camouflage nail print and then dotted gold down the center of my nail. If you don’t have any studded camo pieces in your closet, why not wear them on your nails! To get this look:
 
You will need:
Base coat
Light green nail polish
Dark green nail polish
Brown nail polish
Black nail polish
Gold nail polish
Matte top coat
Dotting tool or toothpick
 
Step 1: First, apply your base coat. Then apply two coats of your light green polish, I used ‘It’s Totally Karma’ by Sephora by OPI. Allow to dry for a few minutes.
 
Step 2: Now, apply patches of the dark green, brown, and black on the nail. First, using your darker green polish, I used ‘Leaf Him at the Altar’ by Sephora by OPI, make a few randomly places patches. Then, using your brown polish, I used ‘milk chocolate chunk’ by Sephora, repeat the same step and create a few randomly place patches and you can even overlap the green to create a more camo look. Lastly, repeat this step again and over lapping the other colors, but this time using the black polish, I used ‘Where’s the Soiree’ by Color Club.
 
Step 3: Next, apply your matte top coat. Allow it to dry a few minutes. 
 
Step 4: Lastly, using your dotting tool or toothpick, dip it into the gold polish, I used ‘Charge It!’ by Sephora by OPI, and create dots down the center of your nail. (You can also use studs if you would like). Applying the gold after applying the matte top coat allows the gold to still have a shine rather than it being matte. Then you’re done! Show off those trendy studded camo nails.

Monday, July 8, 2013

Mani-Monday: Neon French

 
I love neon nail polishes, especially for the summer. This time I wanted to create something simple with bright colors. This nail design allows us to take a twist on the classic French manicure by adding color and lines. It’s fun and easy, but it does take a bit longer than other designs because of the drying time. To get this nail look:
 
You will need:
Base coat
White nail polish
Pink neon nail polish
Green neon nail polish
Top coat
Striping tape
 
Step 1: First, apply your base coat. Then apply two coats of your white polish, I used ‘White Hot’ by Sephora by OPI. Wait for your nails to completely dry. Waiting for your nails to dry is important because if your nails are still wet the tape will lift the nail polish).
Step 2: Apply striping tape on the very tip of your nail. Then leave a little bit of space and apply another piece of striping tape. Then leave a bit of space again and apply another piece of striping tape. (LIKE THE PICTURE BELOW)
 
 
Step 3: On the top space apply the green neon polish, I used ‘Summer Rain’ by Duri. Then on the bottom space apply the pink neon polish, I used ‘24/7’ by Sinful Colors. Peel the striping tape off immediately (peel it off slowly). (LIKE THE PICTURE BELOW)
 
 
Step 4: Then, Lastly, apply a top coat and you are done! Simple, fun, and colorful mani’s are just the best.

Monday, July 1, 2013

Mani-Monday: Fourth of July

 
Fourth of July is coming up and we definitely need to get our nails in the spirit! I wanted to create something fun and patriotic. I love the look of each nail being different. This nail look takes some time to create and some patience, but the results will definitely make your nails a showstopper. To get this look:
 
You will need:
Base coat
Red nail polish
White nail polish
Blue nail polish
Top coat
Striping brush or toothpick
Star nail stamp (optional)
Striping tape
 
Step 1: First, apply your base coat. Then apply two coats of your white polish on all your fingers except the ring finger. I used ‘White Hot’ by Sephora by OPI. Apply two coats of the blue on your ring finger. I used ‘Sapphire Siren’ by Maybelline. Wait for your nails to dry.
 
Step 2: PINKY—apply striping tape on the very tip on your nail and then leave a little bit of space and then apply another piece of striping tape and then leave a bit of space again and then apply another piece of striping tape. On the top space apply the blue polish and then on the bottom space the red polish. I used ‘It girl’ by Sephora. Peel the striping tape off immediately. RING FINGER—using a star shaped nail stamp or you can freehand it to create the stars on your ring finger (if you cannot create the stars, you can just create polka dots). MIDDLE FINGER—using a striping brush or toothpick write out July with the polish and 4th with the red polish. POINTER—apply the striping tape leaving space between the next piece. Apply a generous amount of the red polish and peel off the striping tape right away. THUMB—using your red nail polish create a diagonal and then do the same with the blue nail polish.
 
Step 3: Then, Lastly, apply a top coat and you are done with your patriotic nails!
 
Have an amazing Fourth of July!

Monday, June 24, 2013

Mani-Monday: Rainbow Leopard

A few days ago I decided to treat myself to a little shopping spree. And that spree came out to buying 11 new nail polishes (I posted a picture on my Instagram. Follow thatbeautysecret)! I am one HAPPY girl right now…
 
 
When I buy something new, I am the kind of person that likes to wear it or try it right away. So after getting all those colorful new colors I just had to create something that used most of the colors. And this colorful rainbow leopard print nail design was created. It is so fun and summery. I used a lot of different colors, however, you do not have to use as many. You can use 1, 2, 3, or however many as you would like. To get this look:
 
You will need:
Base coat
White nail polish
Light green nail polish
Dark green nail polish
Purple nail polish
Blue nail polish
Pink nail polish
Orange nail polish
Yellow nail polish
Toothpick or dotting tool
Top coat
 
Step 1: First, apply your base coat. Then apply two coats of your white polish. I used ‘White Hot’ by Sephora by OPI. Wait a few minutes for your nails to dry.
 
Step 2: Next, using a toothpick or dotting tool, dip it in each color and create the leopard pattern. I used ‘Yellow Umbrella’ by Sephora, ‘Myrtille’ by Sephora, ‘Picnic in the Park’ by Sephora, ‘Domestic Goddess’ by Sephora by OPI, ‘Caliente Coral’ by Sephora by OPI, ‘It’s Totally Karma’ by Sephora by OPI, and ‘I’m Wired’ by Sephora by OPI. 
 
Step 3: Then, Lastly, apply a top coat and voila! Your fun and colorful leopard nails are done.

Friday, June 21, 2013

Kitchen Beautician: Bye, Bye Blackheads

Image: Google
It’s time to pamper ourselves once again! Do you have large pores or blackheads and you want to get rid of them? Well this mask/peel will do wonders! If you have used the Biore pore strips, you know that feeling of taking the strip off and seeing all your pores and blackheads gone. And on that strip is a “forest” of your blackheads. Well this mask is exactly what those strips will do but for your whole face.

You will need:
1 egg white
Toilet paper or tissue
Cotton ball

Instructions:

Begin with a cleansed face. Separate an egg and keep the egg white in a bowl. Whisk it a bit and leave it aside for a few minutes. Now you can get your toilet paper or tissue (you can experiment with a napkin or paper towel as well to see which works the best for you) and separate the layers.

Now let’s begin applying the mask. Using your cotton ball, dip it into the egg white and apply it onto your entire face. Let it dry partially before applying another layer. You are going to apply 4 layers of the egg white on your face. Allow the fourth layer to partially dry, then apply a fifth layer of the egg white. This time do not let it dry and begin applying the thin toilet paper or tissue over your face. Leave room for your eyes, mouth, and nostrils. Apply another layer of egg white over your toilet paper or tissue being careful not to rip or ruin the paper. You can apply another layer of tissue and then reapply the egg white again. *You may look funny, I could not stop laughing at myself, but it was all worth looking like that*

Allow you mask to dry completely. You can let your mask air dry or fan dry; it is entirely up to you. You will feel your skin tightening. After your mask is completely dry, peel it off. It may hurt a bit but after you take it off you will see that all your blackheads should have come off with the mask. Wash your face with warm water and moisturize.

You need a lot of patience with this mask. Your tissue may rip or some steps might get you frustrated, but you will get the hang of it and you will love the end results.

Monday, June 17, 2013

Mani-Monday: Green Stripes

The first time I saw this nail polish color I fell in LOVE! The color screams summer. I just needed to have it. I created this nail look with this green neon polish as the standout. Your nails are sure to be the center of attention with this new look. To get this look:
 
You will need:
Base coat
Black nail polish
Green nail polish
Top coat
Striping tape or scotch tape
 
Step 1: First, apply your base coat. Then apply two coats of your black polish. I used ‘Where’s the Soiree’ by Color Club. Wait for your nails to completely dry. 
 
Step 2: Next, using your striping tape or scotch tape, place it in the areas you want to stay black. Then using your green polish, I used ‘Summer Rain’ by Duri, apply two coats over the striping tape. Now do NOT wait for the nail polish to dry to take the tape off. Immediately but slowly take the tape off. (note: you can apply the tape on all your nails, but then apply the green polish and take the tape off one finger at a time, therefore not to let the polish dry).
 
Step 3: Lastly, apply a generous amount of top coat and you’re done! Show off this interesting new nail art.

Monday, June 10, 2013

Mani-Monday: Monochrome Splatter


This week I created a monochrome nail design with splatter. This nail look may take a bit of patience and work but I think it was all worth it in the end. All you need is two nail polishes. And the simplicity of the colors allows the design to be the main focus. To get this look:
 
You will need:
Base coat
White nail polish
Black nail polish
Top coat
Drinking straw
Paper plate
 
Step 1: First, apply your base coat. Then apply two coats of your white polish. I used ‘White Hot’ by Sephora by OPI. Wait a few minutes for your nails to dry a bit. 
 
Step 2: Next, we are going to use the straw splatter technique (this is the tough and messy part that requires patience). Using your black polish, I used ‘Where's the Soiree’ by Color Club, put a few drops onto the paper plate. Dip your straw into the polish and then point it at your nail. Now, blow through the clean end to create the splatter effect on your nail. The stronger and faster you blow through, the better it works. If it doesn't work the first time don’t give up. You may not have enough polish at the end of your straw. It takes a few tries. Continue and splatter all your nails and then clean up the edges (you may put tape around your nail to make the clean up process easier). 
 
Step 3: Then, using your black nail polish again, paint half of your nail. Wait a few minutes for your nails to dry
 
Step 4: Lastly, apply a generous amount of top coat and you’re done with this monochrome nail design.

Monday, June 3, 2013

Mani-Monday: Zebra with a pop


I wanted to create a zebra print nail look with a different take on it. So I decided to add a pop of color. I love the end results! You can recreate this look with many different colors, which makes it so much more fun. You can experiment with any color you would like. To get this look: 
 
You will need:
Base coat
White nail polish
Purple nail polish
Black acrylic or nail polish
Top coat
Striping brush or toothpick
Makeup sponge
 
Step 1: First, apply your base coat. Then apply two coats of your white polish. I used ‘White Hot’ by Sephora by OPI. Wait a few minutes for your nail polish to dry before doing the sponging.
 
Step 2: Next, using makeup sponge (you can cut off a small piece of the sponge to use), dip it into your purple nail polish, I used ‘Jo’mina’ by Illamasqua, and sponge it onto your nail in a few places.
 
Step 3: Then, using a striping brush or toothpick, dip it in the black acrylic or nail polish and create the zebra pattern. Wait for about 15 minutes for your nails to dry before applying the top coat. 
 
Step 4: Lastly, apply a generous amount of top coat and you’re done! This nail look has great versatility, so change up the colors and have fun with it.

Monday, May 20, 2013

Mani-Monday: Tropical Flowers

 
The weather has been getting warmer and warmer and I wanted to create some fun and tropical nails. These nails just make me think of Hawaii and the beach. Oh how much I wish I could be lying on the beach on some island right now. Well I unfortunately cannot be there but my nails will bring that tropical feel for me. I used a lot of different colored nail polishes but you can use only two different colors or use as many or as little as you desire. To get this look:
 
You will need:
Base coat
White nail polish
Green nail polish
Yellow nail polish
Purple nail polish
Pink nail polish
Blue nail polish
Orange nail polish
Black acrylic
Striping brush or toothpick
Top coat
 
Step 1: First, apply your base coat. Then apply 1-2 coats of your white polish. I used ‘White Hot’ by Sephora by OPI.
 
Step 2: Next, using your green nail polish, I used ‘Twiggie’ by Color Club, yellow nail polish, I used ‘Yellow Umbrella’ by Sephora, purple polish, I used ‘Jo’mina’ by Illamasqua, pink nail polish, I used ‘Venom’ by Duri, blue nail polish, I used ‘Calypso Blue’ by Sally Hansen, and orange nail polish, I used ‘Orange Fix’ by Maybelline, paint on the flowers on each of your nails like in the picture above. Wait a few minutes for your nails to dry a bit before you start applying the black lines. 
 
Step 3: Then, using your striping brush or toothpick, dip it in the black acrylic and draw on the lines starting from the center of the flower. Then draw on the three dots near the tops of the lines. Wait about 15 minutes for your nails to dry.
 
Step 4: Lastly, using a generous amount, apply a top coat and you’re done! Have fun with those tropical nails and go show them off.